Showing posts with label projects. Show all posts

Wednesday, March 13, 2013

Stampin' Up! Honeycomb Embossing Folder

This was purse was totally inspired by one of my downline, Kris Thomas.  She brought a similar one to our last meeting.  I just thought it was so cute and this is what I came up with.  If you look for directions on "Box in a bag", I think you'll find it no problem.


I used the new Honeycomb Embossing folder #129378 and the Core'dinations Cardstock.    And the "clasp" of the purse is Designer Builder Brads #129329.  Other supplies used:
#125527 Apothecary Art Clear Stamp Set
#125598 Labels Collection Framelits
#118874 Scallop Circle Punch
#119882  Scallop Edge Border
#120992 Cherry Cobbler Seam
#124276 Early Expresso 12x12 Cardstock

 Go make you own for someone for Easter!


Thanks for stopping by! Email me at robynscherzer@hotmail.com if you have any questions!

Tuesday, February 26, 2013

Stampin' Up! Name Frame

Are you looking for a unique gift for a friend or family member?  Well here's one for you.

I had a class this past weekend to make name frames and this is one my 10 year old daughter, Sage, came up with!  I think she did a most excellent job.  One of her BFF's has a birthday coming up.  So Sage called her up and asked her favorites colors and patterns.  And this is what she made!  Everything is current Stampin' Up! except for the background paper.  That's the Sweet Shop paper you can still buy on the Clearance Rack, go to www.robynscherzer.stampinup.net and the shop now button to buy that super cute, super inexpensive paper!

Bought the frame at wally world.  Other supplies used:
#122975 Pool Party Ruffled Ribbon, #124145 Basic Black Scallop Dots, #124139 Old Olive Scallop Dots Ribbon, #122940 Designer Printed Brads, #119246 Rhinestone Basic Jewels, #120907 Decorative Label Punch, #125599 Hearts Collection Framelits, #127553 Typeset Alphabet Bigz, #124005 Silver Glitter paper, #122924 Pool Party Cardstock, #122922 Wisteria Wonder Cardstock, #100702 Old Olive Cardstock.  And the DEAL of the century!  #125408 Sweet Shop Designer Paper!!

Now go and try your hand at making your own name frame.  And if you are in need of supplies visit my website at www.robynscherzer.stampinup.net.


Thanks for stopping by! Email me at robynscherzer@hotmail.com if you have any questions!

Friday, January 18, 2013

Stampin' Up! Artisan Embellishment Kit

Are you like me when it comes to all the cute little embellishments? 
I just love the new Artisan Embellishment Kit.  Its got all these little trinkets and add-ons for cards, scrapbooks and projects.

I absolutely fell in love with this bottle.  What a great table decoration for a wedding or shower.  Or heck just to hang out!

Look closely at the cork.  Its got pearls around it!  I think it looks so elegant.

Go to my website:  www.robynscherzer.stampinup.net to order the Artisan Embellishment Kit #129328 from the Spring Mini.  Don't forget to check out the clearance rack while your there!


Thanks for stopping by! Email me at robynscherzer@hotmail.com if you have any questions!

Wednesday, January 16, 2013

Stampin' Up! Boutique Boxes Designer Printed Kit-

Have you REALLY looked at your Spring Mini Catalog?

Well, I THOUGHT I had but, apparently I hadn't.  After going to SU! Leadership in Orlando this past week, I had so many of those moments of, "I don't remember seeing that in the catalog".

The Boutique Boxes is certainly one of them.  Did you know you get 8 boxes, 8 notes cards and tons of embellishments for only $7.95?

Yea, I didn't know either.  I passed them right by, but here's a picture of all of them put together.


I couldn't help but think, what cute Valentine boxes they would make with the More Amore Designer Paper #129309 in the Spring Mini, add a little ribbon and candy.  I'm for sure placing an order with these on it.  What great gift card holders!!!

Go to my website at:  www.robynscherzer.stampinup.net to purchase these now, #129306 Boutique Boxes.


Thanks for stopping by! Email me at robynscherzer@hotmail.com if you have any questions!

Wednesday, October 24, 2012

More Halloween Fun!

So I had my clubs last week.  And one of the requirements of my club is you have to make swaps.  I don't restrict to Stampin' Up! only, so I don't always share them even though I think they are stinking cute!  But since I talked about in my last post sharing Halloween projects, I thought these two fit the bill.

This first one was from Melissa Ansburg.  She's one of my new downline but she's also in my Lunatic Fringe club.  She embossed the Tangerine Tango with the Spider Web embossing folder and she wanted to make it sturdier so she used poster board.  But you could use the board that comes in our DSP packs.  Cute AND Yummy!


This second one is from my friend, Natalie Bauman.  I love Natalie, she's upbeat and thoughtful and so so creative!  I know this is not only SU! product but for the most part it is.  She used Toxic Treats and Wicked Cool stamp sets.


I love that she used the rosette on the card.  And the color gradient on the witch.

Thanks for stopping by! Email me at robynscherzer@hotmail.com if you have any questions!

Sunday, July 29, 2012

Good Evening!
I'm still trying to catch up on everything with coming home from convention but wanted to get some projects posted and share this new recruit special starting August 1!

Spooktacular Offer


Yes, you read that right! Stampin' Up's got a spooktacular offer for new recruits during the month of August. It was announced at Convention 2012 that during the month of August, all new demonstrators will receive a FREE Howl-o-ween Printer’s Tray project kit!

This boo-tiful kit contains all the bits and pieces to create a super spooky Halloween decoration (except for the ink) you won’t want to miss out on this exclusive offer! (retail $35)

Howl-o-ween Printer’s Tray project

To sign up, please go to my website:  www.robynscherzer.stampinup.net.  Click the "Join the Fun" and then click on "Join Now" and follow the prompts.

Remember to sign up August 1st - August 31st to get this project kit FREE along with all the other benefits of being a Stampin Up! demonstrator.
For everyone who signs up, I'll be offering a free class, September 15,  for us to all get together and PUT IT TOGETHER!  How many times have I gotten something cool like this and NOT put it together??  Too many to count. And if you just want to be that "kit-napper" you can do that too!  You get $125 of any products you want with FREE shipping, plus the great Halloween kit.  AND if you just want the kit, I'll give you $10 in product for all your business supplies!  So you get over $160 in products for only $89!  Such a deal!  Let me know if you have any questions.
 
While at convention my roommate Kris Thomas gave us these adorable gifts!  I LOVE it so much, those are fuzzy socks in the top!
 

And look at this cute punch art tag!  Its the Petite Pennants Builders Punch and the Cupcake punch.
Sage and I might make these for party favors for her next birthday party!


I made these notepad holders for my downline who attended convention.  The inside has a pocket to hold miscellaneous receipts and such.
 
I liked how well these turned out so much that I decided to do a class on making them!  I thought these would totally make a great teacher or co-worker gift for Christmas (or Birthday).  I used the new Alphabet set for the Big Shot called Typeset Alphabet Bigz.  The class for these will be August 25 at 1pm.  You can make one or multiple ones.  The cost for the first one is $8 and $5 for each additional one.  And of course this includes the matching pen. Please RSVP by August 11.
 
As most of you know, I earned the Stampin' Up! Fiji trip.  Well my sweet sweet husband had this adorable cake waiting for me when I returned home from convention..............it was his first attempt with fondant and I think he did an awesome job.


Its an island made with rice krispy treats,so are the palm trees and you can see little fish off to the side and of course the white is beach!  And a treat of Fiji bottled water for me.
He's so proud of me for earning it an of course he's so excited to be going in 10 months!  Thanks again to all of you who made it happen!


Thanks for stopping by! Email me at robynscherzer@hotmail.com if you have any questions!

Friday, April 13, 2012

Good Evening,
Blogger updated the way we post and I don't like learning new tricks!  So hope I'm doing this right!

I had my downline meeting on Wednesday and I did the make and take.  I had seen this garden stakes everyone was doing and I thought, hmmmmm.  I have the Big Shot and LOTS of Bigz dies and I even have a roll of the right type of flashing!  So I cut and embossed many pieces of flashing with various shapes and this is what I came up with I'm super happy with it.  I hope you like it to!

I found the garden stake at the Dollar Tree and the jump rings at my local craft store.  I used the Circles 2.  The bigger of the 2 circles and of course they are embossed with the polka dots folder.
And than butterflies.  I wanted a touch of color so I added our glimmer brads.  And of course the crop-a-dile sure comes in handy for punching those holes!


My husband, got the idea to put a fishing spinner thingy on the top so it would be more free to spin in the wind. I do believe that's the technical term! :0)

Thanks for stopping by! Email me at robynscherzer@hotmail.com if you have any questions!

Thursday, March 8, 2012

Explosion Purse

Hi Gals!
I know its been a while since I've posted some fun projects.  Well here's the first of many....

I got this idea off of SCS from Qbee's Quest.  Super idea!  I used Always Artichoke cardstock along with the Paisley Petals DSP and the stamp set Field Flowers.  The handle is Always Artichoke seam binding.


Here's the inside view.  I'm thinking either pictures for Grandma OR 3x3 Love Notes with envelopes for a gift.

Thanks for stopping by! Email me at robynscherzer@hotmail.com if you have any questions!

Thursday, November 3, 2011

Family Gift Giving!

I just finished this project for a class I'll be doing in December and I just LOVE how it turned out!  I think I'll be doing one for multiple family members....shhh, don't tell!  And I think YOU would love it too to make for Grandma/Grandpa, mom, aunt etc....
I actaully CASED this from Stamp to the Max.  I didn't do it exactly like her, I changed a few things up but what an awesome idea!  Thanks Max!


Here's the deaIio...If you were to do this project on your own, you'd probably spend over $200 on just the supplies used. Heck, the Serif Essentials Alphabet, for the Big Shot, alone is $149.95. (Which by the way I just got and I DO love them. Can't wait to make some birthday banners and holiday banners with it).

I'll be offering 2 classes to help you in your Christmas gift giving for only $30! Saturday, December 10 at 2pm and Friday, December 16 at 7pm. The class includes what you see above (except for the cute family pictures), the frame and a bottle of Tombow Multi Adhesive to help put it all together.

If you are distance from me, I'll be offering this by mail as well, cost is still $30, only thing I won't ship is the frame.  But written directions and all elements will be included, you just need to buy the frame and put it together at home.  Shipping will begin week of November 21, 2011.
 Email me if you are interested.


Thanks for stopping by! Email me at robynscherzer@hotmail.com if you have any questions!

Tuesday, October 11, 2011

Its a Wrap!

Here's one of the projects we did in my clubs last week.  Really super easy and everyone seemed to be WOW'd by it.  I sold 9 of these stamp sets, so I'd say yea, it wow'd em!

The stamp set is in the Holiday Mini on page 14 and its called It's a Wrap Holidays.  We used markers to color the stamp so we could get different colors.   Stamped on Avery Labels and wrapped them around a Hershey Nugget.

And of course the topper was made with the Big Shot and the Top Note and Spider Web Embossing folder.  Way easy and super cute.  Sage and I will be making these for her class this Halloween.


And don't forget, Stampin' Up! is running the deal for the Free Big Shot if you join the Stamp' Up! family this month.  Its an amazing deal!  Over $435 worth of product for only $175!!!

I would love for you to join my group The Craft Pots.  Go to my website: http://www.robynscherzer.stampinup.net/ and to the join now tab.


Thanks for stopping by! Email me at robynscherzer@hotmail.com if you have any questions!

Saturday, September 3, 2011

Stop on by the County Fair!

This weekend is busy to say the least!  For the 3rd year in a row, I have a booth at the Walworth County Fair.  Its a lot of fun and I love meeting new people!  This year, my supporting demonstrator, my hubby Edwin, has really helped out!  Fiji is on the horizon and he doesn't want to miss out and neither do I!!

We did some creating with items from the new Holiday Mini.  If you don't have it stop on by my booth and pick one up!  I'm right across from the fair office.  And if you place an order with me at the fair, I'll give you FREE shipping!

We are doing a little make and take with the Stitched Stockings stamp set and coordinating Stocking builder punch.  Don't you just LOVE the glitter paper???  We now have it in silver too!!


I got the idea for the box while at convention.  I just LOVE this Big Shot Bigz L Die!  Yes, that's right its in the Holiday mini.  And it has the cutest Stocking Accents!  This just might be Sage's classmates Christmas box this year.


If you'd like to make this cute little box and see other items showcased from the Holiday Mini, book a workshop in September or October!


Don't forget to stop by my booth at the fair Sunday 10-3:30pm or all day Monday to get your FREE shipping with any other you place with me at the fair.

Hope to see you at the fair!!


Thanks for stopping by! Email me at robynscherzer@hotmail.com if you have any questions!

Tuesday, August 2, 2011

Sweets for the Sweet


I know convention has been over for a couple weeks, but I have to share this picture.  These are all the FREE I got while I was there.  6 stamp sets, extra make and take packets (which I'll be sharing one in August if you host a workshop) and just too much to mention.  I sat down and figured it up as best I could and I got over $200 worth of FREE!!!  So if you've ever been thinking about becoming a demo, this is for sure one of the perks!


While I was on the Alaska Cruise, we were able to do make and takes and we were given a big bag of supplies to do so.  This is one of the projects.  Its made with the stamp set Sweets for the Sweet.  And you can see the groovy new ruffled ribbon.  LOVE IT!!  And of course all the new In Colors. Its one of those cards that you can put pictures in.
I decided I wanted to show my club members and other customers how simple and cute this would be.  The buzz was Christmas Card! 


Since I didn't have all the supplies to remake in bulk, I pulled out my color coach and came up with this one instead.


And here's the inside.  My cruise sample was stamped inside as well.  But I left it off this one.  All you need is a 8x8 piece of cardstock.  Fold in half, turn it 90 degrees, fold in half again, and do ONE triangle.  Take one corner and fold to the other corner in a triangle.  And you have your little book.

Thanks for stopping by! Email me at robynscherzer@hotmail.com if you have any questions!

Tuesday, January 4, 2011

Happy New Year!!

I know most of you are like me and are wondering where the heck 2010 went???  YIKES! 

Well, I've been busy of course, undecorating from the Holidays, stamping and writing thank you notes, preparing for Sage's 8th birthday on January 5 (oh my that's tomorrow!) and getting ready for a blog hop!  Yes, you heard it right, a blog hop.  What I was thinking??  I'm not sure but check back here January 7 and start hopping!!

Because I had to come up with 3 projects for the hop, I haven't had a lot of time to create other than for the hop.  So I wanted you to know I haven't forgotten about you...and I looked in my archives and found this awesome picture of amazing projects!!!  This is actually the workshop board from Shelli Gardners's Workshop of a Lifetime for my wonderful downline, Micky Seerveld.  As Shelli and Sara were setting up after our downline meeting, I snapped a picture of it.  Enjoy!


Thanks for stopping by! Email me at robynscherzer@hotmail.com if you have any questions!

Wednesday, December 29, 2010

Christmas Downline Swaps-Stocking

This next project was done by Micky Seerveld.  If you purchase our fabric, you get awesome instructions on how to make projects and a stocking is one of them!
She used brads around the top of it.  Now if I could only sew......


Thanks for stopping by! Email me at robynscherzer@hotmail.com if you have any questions!

Monday, November 22, 2010

More Christmas Fun...

I did a craft/vendor fair last week and in addition to making Reindeer Mints, I also made Reindeer Food, well Sage made the food, I did the packaging.
Again using the Owl Punch and Snowflake Punch.  Way easy and really cute.  Great deals on-line so go ahead don't be afraid go order that punch!!!  Shop now at http://www.robynscherzer.stampinup.net/.


And to get you in the Christmas spirit some more, this is a little card we did last month at my workshops. 


This is a 3x3 card using Old Olive cardstock and ink along with the Paisley Print tree and the Merry Christmas is from Teeny Tiny Wishes.  And you can't see it really well but the trees are sprinkled with Dazzling Diamonds. 


Thanks for stopping by! Email me at robynscherzer@hotmail.com if you have any questions!

Saturday, November 20, 2010

Double Trouble!

Well, I'm shocked to say the least that I have not posted on my own blog in almost 2 weeks.  I HOPE some of you were wondering where I went!  :0)

I have been a very busy person........as you will see by my photos below.  I'm not exactly sure what came over me but we have TWO new additions to our little family.


Meet Murphy (on the left) and Marley.  They are what is now known as "Boxadors".  I find that very funny, that just because a boxer and a lab got together by mistake, we have 2 "designer" dogs!  I believe my mom's generation would call them "mutts".  They are so stinking cute and so full of the dickens.  The first night when I was awakened at 2 in the morning, I had to wonder what the heck I had done!  And yes, it can only be blamed on me, I was only to suppose to get one, but I couldn't take the brothers away from each other.

Needless to say, we have one very happy little girl.....


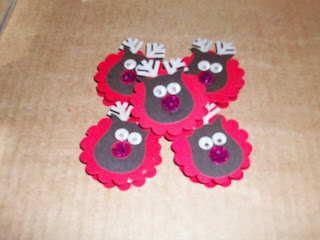
I did however manage to get some crafting time in and made this cute Reindeer mints out of the Owl Punch and Snowflake punch.


Now aren't you sad you didn't buy that owl punch?  It has super crafting powers!!  More projects tomorrow. 

OH and don't forget to take advantage of the starter kit special for only $87.50 through November 30, 2010.  You'll receive over $300 in products for about 75% off retail!  Now that's a deal!!  Go to http://www.robynscherzer.stampinup.net/ and the join now button with the code: wisconsin and you'll be in crafting heaven!!!


Thanks for stopping by! Email me at robynscherzer@hotmail.com if you have any questions!

Monday, November 8, 2010

Leaves Are Falling...

Thanksgiving is just zooming towards us.....and I wanted to share what I'll be doing for a table place card this year.  Super simple but your guests will be like WOW, you are amazing!


I used the stamp set Falling Leaves, with the Teeny Tiny Wishes for the Happy Thanksgiving.  Colors used were Chocolate Chip, More Mustard and Cajun Craze.  I took two tags that I cut out with the Big Shot with the Bigz Die Two Tags and Crumb Cake cardstock.  I created a little "tent" tied it with natural hemp and stuck a mini Hershey's bar in it with glue dots.  I would either handwrite or stamp the person's name on it.  Really simple.

It was a beautiful day in Wisconsin yesterday and we were out working on our yard, raking leaves and such.  Our beautiful daughter, Sage, was helping but whining a little, "I'm so tired", etc.  So I caught her taking a break in our Apple tree and just thought this was such a cute shot.  How could a mom be mad??


Thanks for stopping by! Email me at robynscherzer@hotmail.com if you have any questions!

Wednesday, November 3, 2010

Tom Turkey!

Its amazing how quickly Halloween came and now Thanksgiving is knocking on the door!!
Just wanted to share a quick project.  I made this last year but they are so cute thought it was worth sharing.

He, of course is made mainly with the scallop circle punch.  I hand cut his hat and used a black marker for his eyes.  He was attached to a peppermint patty but of course that is long gone. 


I used the Boho Blossoms punch for his feet and just hand cut his nose.  Colors used:  Chocolate Chip, More Mustard, Old Olive, Pumpkin Pie and Real Red.

Thanks for stopping by! Email me at robynscherzer@hotmail.com if you have any questions!

Thursday, October 28, 2010

Halloween Approaching Fast!

Good Morning Everyone!

I had to post this picture of the finished products of all Sage's Halloween treats.  They turned out so stinking cute!!!  What I liked about these better than ones I've done in the past, is the bottoms are sealed and crimped so the kids can use them to put other things in later.  Stickers, pencils etc....


This next project was done by one of my newest downline members, Kris Thomas.  Its so cute and is going to work with me today to sit on my desk.  Hand santitizesr at a refuse and recycle company is a must!! :0)


The Bitty Bat punch is behind the bottle, you can see his little wings sticking out.  These cute hand santitizers were from Bath and Body Works, this one is Spiders Web that is licorice and I saw another one that was Vampires Blood.  Kris got the idea from this gal : http://pinkbuckaroodesigns.blogspot.com/2010/08/halloween-soap-holder-tutorial.html

I hope that works right, first time I put a link in!

Have a great day!!

Thanks for stopping by! Email me at robynscherzer@hotmail.com if you have any questions!

Monday, October 25, 2010

Halloween Treats!

OK, so a few posts back, I posted the Spooky Box that we did in my monthly workshops and I said I'd be making them for my daughter Sage's 2nd grade class.  Well, I changed my mind.....

Sage and I spent a couple hours on Sunday creating this adorable candy bar holder.  I saw something similar to it on Angie Juda's blog and my friend Micky Seerveld had a tutorial posted on her blog.  Since its for 2nd graders, I decided using up my retired stash was the way to go. 


This one is our prototype, currently we have eyeballs, eyelids and noses all over the place to make 30 of these.  I just wanted to share because I thought it was so cute even though my mouth and fangs are NOT perfect. So as you can see from the above picture that Sage has pulled out a Hershey's candy bar.  I better get cracking to be done by Wednesday.

Have a great Monday!


Thanks for stopping by! Email me at robynscherzer@hotmail.com if you have any questions!