Showing posts with label project. Show all posts

Wednesday, February 6, 2013

Stampin' Up!'s Soda Pop Tops


Don't you love the Soda Pop Tops in the mini catalog?  I do to, but what to do with them?  Well, here's a creative idea that I saw at Leadership.
A magnetic board!


 The artist attached magnets to the back of the soda pop tops #129388 (only $3.95!) She also used the Itty Bitties Stamp Set #128939, along with the beautiful Sale-a-Bration Designer Series paper Sycamore Street #127540.

What a great idea!!   


Thanks for stopping by! Email me at robynscherzer@hotmail.com if you have any questions!

Thursday, February 16, 2012

Happy Valentines Day!!

Good Morning Everyone!

I know this is two days late but thought I would share anyway.  Here's a picture of all the treat boxes we made for Sage's classmates and friends.


We used the Bitty Box Big Shot die to make the box.  All the cardstock is retired, its Pink Passion and Lovely Lilac.  Of course the heart is our lovely Red Glitter paper and we used the Happy Valentine's Day Stamp from Teeny Tiny Wishes punched out with the Modern Label punch.  And we filled them with Hershey Kisses!

Thanks for stopping by! Email me at robynscherzer@hotmail.com if you have any questions!

Saturday, October 29, 2011

Pumpkin Carving and Pumpkin Punching!

WOW, October has certainly flown by, I can't believe Halloween is in 2 days!  I have a quiet moment and thought I better get some posting done!

I have to share a few personal pictures.  My neice, Piper and my daughter Sage have carved pumpkins together now for a few years.  They love each other and unfortunately we don't get to spend a lot of time together even though we only live a city a part.  Life just gets in the way, but times like this make me think we HAVE to make time for the fun family times!!!

This first picture cracks me up, because notice Marley in the lower left hand corner??  He's totally absorbed in what the heck the girls were doing.  He sat like that the whole time they were craving.  Whereas his brother, Murphy really didn't seem to care.


Of course there was lots of messing around before the finished products were done.  You know, pretending to eat the guts of the pumpkins.  Feeding the pumpkin to the dogs etc.
But below is the finished pumpkins.  I really love this picture of Sage and Piper, no clowning, just their beautiful selves!


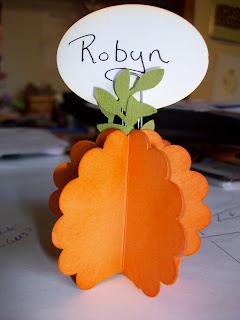
 And course because this is a blog about papercrafting........here's what we made this month in some of my workshops.  I'm forever forgetting to write down where I found the idea.  But I get most my inspiration from SCS.  And a gal there was kind enough to do a tutorial on how to make the below pumpkin.  Of course its punched out with the 2 3/8 scallop circle punch.  You do that 6 times, score them in the middle and add a little inking around the edges.  Attach 3 of them together, so you have 2 halves.  Using sticky strip on both halves, put a paper clip in the center of one of the halves.  The branches are from the bird punch, you put those on the sticky strip as well.  Cut the bottom scallop off each half, put a penny on top of the sticky strip at the bottom, for weight.  Put the 2 halves together and presto! you have a great name place holder for Thanksgiving!!!


When my club gals saw this, they started going on about all the other great ideas you could do....if you had a buffet, place in front of each of the dishes.  Make them out of the ornament punch for Christmas, make them out of the Scallop Square punch like Christmas presents, etc etc.....they're so smart!

Thanks for stopping by! Email me at robynscherzer@hotmail.com if you have any questions!

Wednesday, October 19, 2011

Christmas Keepsakes Box

Christmas Keepsake Special Offer

The Christmas Keepsake Box is available for order from now until December 31, 2011 (or while supplies last). This box is an ideal gift, and is perfect for your papercrafting in time for the holidays. Unlike the original offer in July, this Christmas Keepsake Box does NOT include the Pines & Poinsettias stamp set. But you get everything else you see...........cool!


Special Offer Details:
  • Orders can be placed as customer, workshop, or online orders.
  • There is no minimum purchase required.
  • The Christmas Keepsake Box includes written instructions, but the following supplies are not included that are needed to complete the project:
    • Pines & Poinsettias stamp set
    • Early Espresso Stampin’ Write Marker
    • Real Red Stampin’ Write Marker
    • Wild Wasabi Stampin’ Write Marker
    • Adhesives
    • 3/16" Corner Punch
    • Paper Cutter
    • Paper Snips
    • Needle
    • Glue gun
Item #NamePrice
129024Christmas Keepsake Box$19.95

Place your online order today before supplies run out!!!

Thanks for stopping by! Email me at robynscherzer@hotmail.com if you have any questions!

Saturday, October 15, 2011

Witch's Shoe

I wish I could take credit for this but I can not........at my last downline meeting, Roxanne Mandujano brought a show and share of her Halloween Class she did last month.  And this is one of the projects.  I had a hard time taking a good picture of it so here are multiple views.


She said she found the template online so I can't help you with that but I will do a search because of course we all started yelling out ideas of what other type of slippers you could make.
Princess slipper, Dorothy's shoe from Wizard of Oz (wouldn't that be cute with our red glitter paper!), wedding shoe, pink breast cancer shoe, etc.

She also had the class stamp in black stazon, the cello bag with spiders.  CUTE CUTE!!!

Thanks for stopping by! Email me at robynscherzer@hotmail.com if you have any questions!

Tuesday, July 12, 2011

Off to Convention!

Well tomorrow is my annual pilgrimage to Stampin' Up!'s convention. 

So very excited to see all the new and 'stinkin cute' things they show us.  And of course just to have some fun me time!  Edwin calls it my "living the high life tour".

I wanted to show you what I did for my roomies.  Everyone that goes to convention gets the same bag so it can be a little crazy looking for the one that belongs to you.  So I made these personalized key chains for us. 

I think they're cute and I hope they like them.


They have the little 3x3 post it notes in them, so when you are scrambling for that piece of paper you have it!
I used the new Wisteria Wonder and Concord Crush In Colors along with the Elegant Monogram Stamp set.  The set I used for the background is Circle Circus.  Way easy to make and I think super cute.

While I'm away, I'll be running my "Convention Sale".  For every $50 you purchase online through my website, I'll give you a $10 gift certificate to use on your next purchase.   And with the new catalog you know that will come in handy!!!  Just go to my website:  http://www.robynscherzer.stampinup.net/ and shop between July 13 and July 17.  Once I get home, I'll mail out your gift certificate.  This would also make a great gift for that crafy someone in your life!

Thanks for stopping by! Email me at robynscherzer@hotmail.com if you have any questions!

Monday, January 24, 2011

Sage's Winter Wonderland!

OK, I just had to post this. I know its not stamping related but I thought for my first cake, I did pretty darn good!!

Sage turned 8 this month and wanted to have a party with a Winter Wonderland theme.  So I made her a snowman cake.  Super easy and I think turned out REALLY cute.


We love to watch Cake Boss and she said I could be the next Great Baker!!  ;0)

Thanks for stopping by! Email me at robynscherzer@hotmail.com if you have any questions!

Monday, December 27, 2010

Christmas Swaps-Ribbon Board

This next project was done by Margie Slyck.  She said she was inspired by something she saw up north in Wisconsin and put her own twist on it.
She used a blank painters canvas and put our Stampin' Up! fabric over it and stapled it to the other side.  And she used red grosgrain ribbon to hold the cards.
What a super cute way to display all your cards!!!


And the receipent of this gift got all those sweet 3x3 cards as well!

Thanks for stopping by! Email me at robynscherzer@hotmail.com if you have any questions!

Friday, December 24, 2010

Christmas Downline Swaps -Cute Clock!

I wanted to post pictures of the awesome projects we received at my December downline meeting.  We do a project swap along with having a nice dinner together.  If you join my team, you could be the receipent of one of these awesome gifts!!!

This gift was done by Vicky Brockman.  The clock face is a stamp and I'm sorry I don't know which one, I don't have a book with me!  I know gasp!  But she stamped it on cardstock and placed it on a wooden circle she had gotten at a craft store and she also purchased the clock mechanisim from the craft store as well.  WAY cute!!


Check back next week for pictures of more cute projects.
I hope you all have a wonderful and Merry Christmas and rememer Jesus is the Reason for the Season!!!

Thanks for stopping by! Email me at robynscherzer@hotmail.com if you have any questions!

Thursday, December 23, 2010

Merry Christmas!!

WOW, I guess my 12 days of Christmas wore me out!  I realized I haven't posted in weeks!  So sorry, but as most of you are busy with Christmas, so are we at the Scherzer household!

Sage and I along with my sweet husband, Edwin, made all these Santa boxes for Sage's class.  She hand wrote everyone's name on the brim of the hat and we filled with a toy and a Reese PB cup.


Thanks for stopping by! Email me at robynscherzer@hotmail.com if you have any questions!

Sunday, December 12, 2010

12 Days of Christmas-Day Twelve!

So sorry, this didn't post yesterday!!!

We had our downline meeting last week and this was the project we did for our make and take.  Its so stinking cute and EASY!!  We used the Bitty Box die with the Big Shot and the Polka Dots embossing folder to texture his beard, mustache and hat.  I got the idea from 2 different people and I kind of combined what they both did for the supplies I had.


Punches used are Ornament for beard, just cut off the top.  Bird punch for moustache, 1/2" circle punch for nose and hat tassle.  The rim of the hat is the wide oval punch.  I used the owl punch for his eyes and of course the white gel pen.
I'll be making a bunch of these for Sage's class.

Have a great day!!!

Thanks for stopping by! Email me at robynscherzer@hotmail.com if you have any questions!